
Order Block Conditions: How to Tell a Strong OB from a Weak One
Everyone who learns SMC learns the Order Block in the first week.
They draw it, enter from it… and price breaks it and keeps going.
So they ask: does the Order Block even work?
Here's the truth: the Order Block works. Just not every Order Block.
The candle you drew may look right, but sit in the wrong place. In this article, we'll go through the conditions that separate an Order Block you can rely on from one that will hit your stop.
What Is an Order Block?
The common definition: an Order Block is the last bullish candle before a drop, or the last bearish candle before a rally.
If price explodes to the downside, you look for the bullish candle right before it. If it explodes to the upside, you look for the bearish candle right before it.
In SMC, we say this is where market makers entered. If you're not sure who they are, start with our article on smart money.
For a simple introduction to Order Blocks, see The Best Way to Use Order Blocks. This article goes into the details.
How to Draw an Order Block Correctly
The traditional method is to mark the last opposite-colored candle before the move. That's what anyone learning SMC or ICT does.
In my view, there's a more precise way:
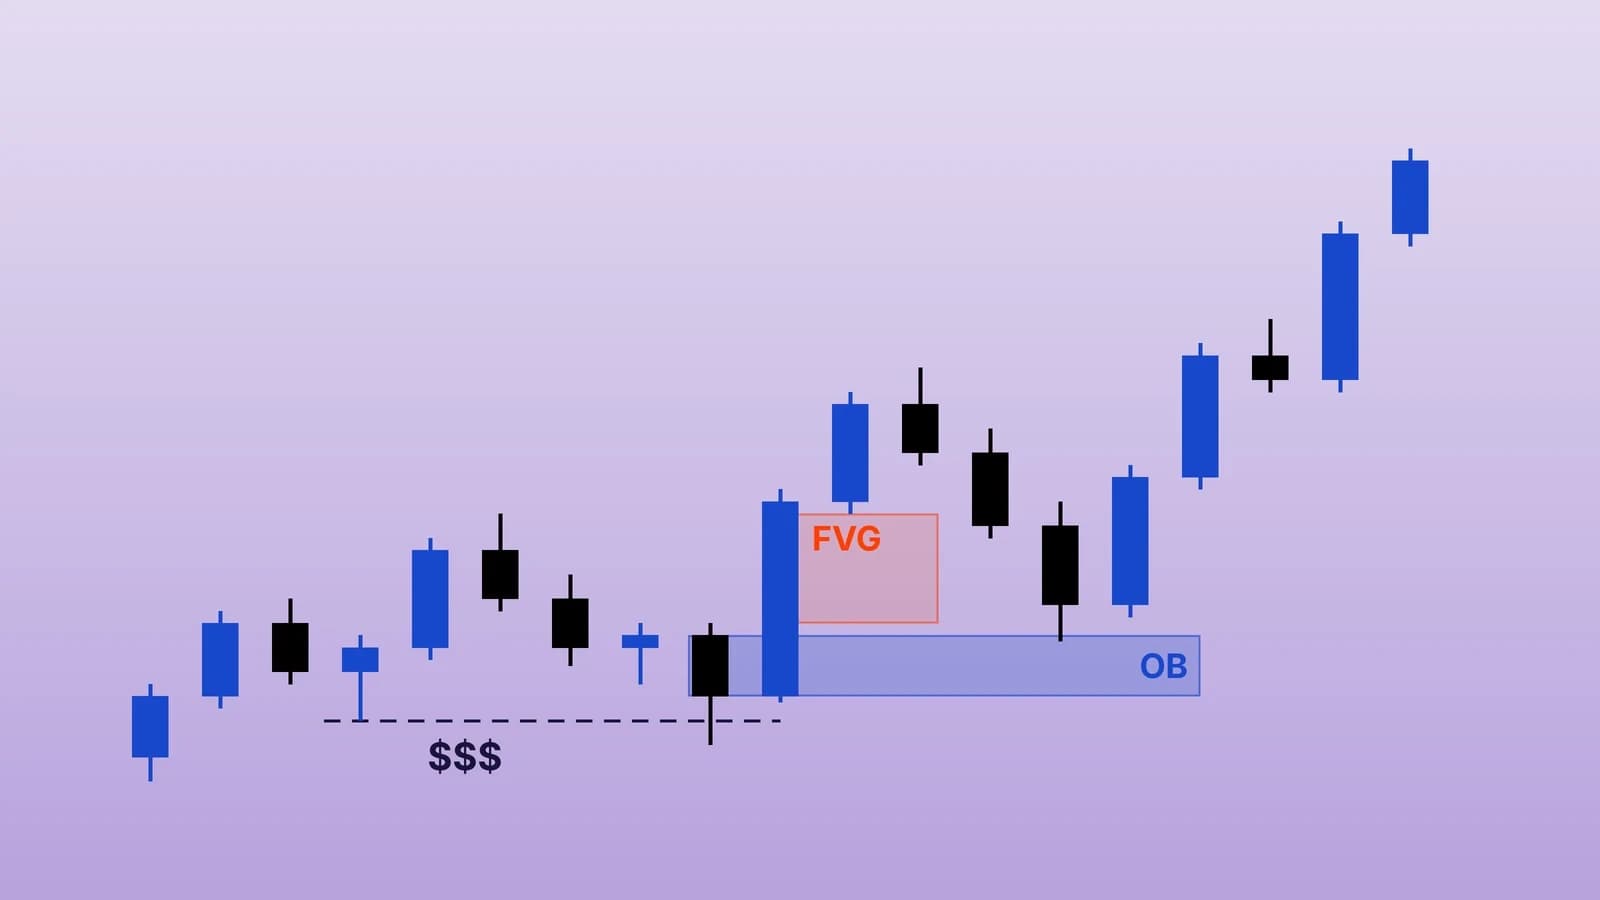
The Order Block is the candle directly followed by an FVG.
In other words, the last candle before the strong move that left an imbalance behind it.
You might say: but that candle is bullish, not bearish!
It doesn't matter. With this method, the candle's color isn't the point. What matters is that an FVG forms right after it, and that it's the last candle before the explosion.
And if the candle you marked isn't followed by an FVG? Then don't call it an Order Block at all.
The Conditions of a Valid Order Block
Condition 1: An FVG Forms After It
For me, this isn't just a strength factor. It's a basic requirement to call it an Order Block in the first place.
One important detail: if price comes back and fills the FVG after the Order Block, that's it. The FVG has been taken, and that Order Block no longer counts.
Condition 2: It Aligns with the Overall Trend
If the overall trend is up, you won't rely on a bearish Order Block, even if it looks perfect.
Why? Because you'd be trading against the trend, and price will likely hit your stop and continue.
We define the overall trend through market structure. If there's only an internal CHOCH while the overall trend is still up, we're still looking for bullish Order Blocks.
Condition 3: It Sits at a Strong High or Low
The best place for an Order Block is at strong highs and lows.
What makes a low strong? It sweeps the liquidity of a weak low before it.
Price dips below an internal low, takes the stops beneath it, and comes back. That new low is now a strong low, and the Order Block at it is a strong Order Block.
The opposite: an Order Block at a weak high that hasn't taken any liquidity is a weak Order Block.
For me, this is the most important condition of all.
Condition 4: Liquidity Works for It, Not Against It
Two things here:
Liquidity taken before the Order Block formed: this strengthens it.
Liquidity on the way to the Order Block: if price takes more liquidity on its way to the Order Block, the market maker has picked up "fuel" before touching it. Liquidity taken below and liquidity taken above means strength on top of strength.
The case to avoid: an Order Block against the direction of the liquidity sweep.
Example: on the 4H chart, the trend is up and price has swept the liquidity of two lows below. Even if you find a great-looking bearish Order Block on the 1H chart, you can't rely on it. Price will likely rally and break it.
Condition 5: It's Alone in the Wave
If a single wave contains 3, 4 or 5 Order Blocks in a row, you have a problem.
Which one do you rely on?
The rule I follow:
The first Order Block in the wave is often liquidity. Most traders enter from it with stops right below, so price drops to take those stops. That's what we call a Smart Money Trap.
If you have to choose, pick the last one (the Extreme). The last Order Block in the wave is the most likely to be respected.
Better yet, go up a timeframe. If the chart is full of Order Blocks, move to a higher timeframe until you have one Order Block, or two at most.
Condition 6: The Distance Is Reasonable
The Order Block shouldn't be too far from current price, with lots of candles, highs and lows in between. The farther it is, the more other factors come into play and change the picture.
Also watch its position relative to Premium and Discount: sell from Premium zones, buy from Discount zones.
When Has Price Respected the Order Block?
Not just because price touched it and bounced a little.
Price has respected a bullish Order Block when it bounces from it and makes a new high. For a bearish one, when it bounces from it and makes a new low.
If it bounces a bit and then comes back to break it, it wasn't respected.
Order Block vs Supply and Demand Zone
The most frequently asked question.
A supply or demand zone is the whole area: the group of candles where accumulation happened before the move. The Order Block is one candle inside that area.
So we use the Order Block to narrow down the supply or demand zone.
The benefit? Enter from the start of the whole supply zone and your stop is large. Enter from the Order Block and your stop is much smaller, with a much better Risk Reward.
By the way, a supply or demand zone is judged by the same conditions: an FVG after it, alignment with the overall trend, and a strong high or low. For a detailed comparison of Order Block, Supply & Demand and Order Flow, read The Difference Between Order Flow and Supply & Demand.
Order Block Types: Do the Names Matter?
You'll hear lots of names: Mitigation Block, Unmitigated Block, Rejection Block and more.
Honestly, I don't like getting into these names, because they confuse more than they help. The two types worth knowing:
The regular Order Block: the whole candle.
The Rejection Block: if the candle has a long wick that swept liquidity and closed strong, some traders mark only the wick as the entry zone.
But the whole idea isn't in the name. It's in the Order Block's location, the effect of liquidity on it, and the trend it sits in.
What Is a Flip Zone?
A Flip Zone is a demand zone that failed and flipped into a supply zone, or the other way around.
Price drops into a demand zone, reacts and moves up a bit, but fails to make a new high. Then it drops and breaks the zone. That demand zone has failed, and a supply zone forms in its place.
When price comes back up to it, it will likely reject and continue down. And if that Flip Zone also swept the liquidity of an internal high, it's even stronger.
Is the Order Block Guaranteed?
No. Nothing is 100% in trading.
Even an Order Block that meets every condition can break. These conditions raise the probability; they don't guarantee the outcome. And an Order Block alone isn't a complete setup. You need to combine it with liquidity and market structure, and respect risk management.
The Bottom Line
An Order Block isn't just any candle against the move.
A valid Order Block: has an FVG after it, aligns with the overall trend, sits at a strong high or low, has liquidity on its side, and stands alone in the wave.
If those conditions aren't there… leave it and look for another.
Want to see these conditions applied on the chart step by step? Watch the lessons Order Block Is Not a Demand Zone and Order Block 2.0 on the WolfCharts YouTube channel. Practice, and send me your chart on our Telegram channel.